Three.js [axisHelper、gridHelper ]ヘルパーを使い、グリッド平面を表示する。
- 2021.12.13
- 01_技術ブログ Three.js
- #Javascript
![Three.js [axisHelper、gridHelper ]ヘルパーを使い、グリッド平面を表示する。](https://notetoself-dy.com/wp-content/uploads/2021/12/grid-890x500.jpg)
こんにちは!
プログラム学習中のdynaです。
この記事は、three.jsで便利なヘルパーを使って、グリッドの線を表示する記事です。
デモ↓
See the Pen three.jsでLINEを作成 by dyna (@sakudyna) on CodePen.
画面内をマウスで動かすと動くので、遊んでみてね(^^)
このグリッドの面と縦横の中心線を表示するには、以下2つのヘルパーを使用します。
AxesHelper
簡単な方法で3つの軸を視覚化する軸オブジェクト。
X軸は赤、Y軸は緑色、Z軸は青。
X軸は赤、Y軸は緑色、Z軸は青。
GridHelper
GridHelperは、グリッドを定義するためのオブジェクト。グリッドは、線の2次元配列。
参考:https://threejs.org/docs/#api/en/helpers/AxesHelper
参考:https://threejs.org/docs/#api/en/helpers/GridHelper
便利なヘルパー!!
ヘルパーの書き方
AxesHelper
AxesHelperはデモでいう、上に、横に伸びている色のついている線です。
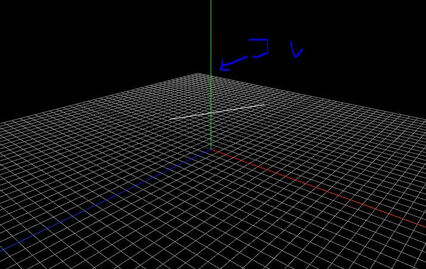
引数の意味は、
AxesHelper(線のサイズ)
です。
コードに当てはめると、
1 2 3 4 | const axesHelper = new THREE.AxesHelper( 5 ); scene.add( axesHelper ); |
となります。
GridHelper
GridHelperはデモでいう、グリッドの平面のようなものです。
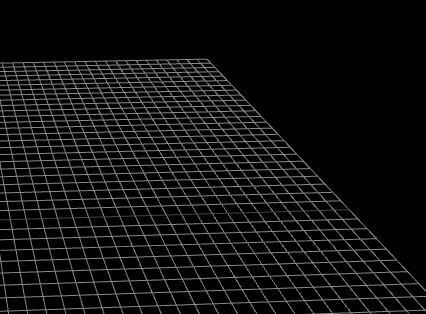
引数の意味は、
GridHelper(サイズ、分割数、colorCenterLine、colorGrid)
です。
コードに当てはめると、
1 2 3 4 | gridHelper = new THREE.GridHelper(80, 50,0xffff00) scene.add(gridHelper); |
となります。
コード
全体のコードです。
ヘルパーと分かりやすいように棒線を1本入れています。
今回は頂点座標を表示する練習をしていたので、その部分も入っています。
body部分から抜粋しています。
1 2 3 4 5 6 7 8 9 10 11 12 13 14 15 16 17 18 19 20 21 22 23 24 25 26 27 28 29 30 31 32 33 34 35 36 37 38 39 40 41 42 43 44 45 46 47 48 49 50 51 52 53 54 55 56 57 58 59 60 61 62 63 64 65 66 67 68 69 70 71 72 73 74 75 76 77 78 | <body> <div id="WebGL-output"></div> <script type="module"> import * as THREE from'https://unpkg.com/three@0.126.1/build/three.module.js'; import { OrbitControls } from 'https://unpkg.com/three@0.126.1/examples/jsm/controls/OrbitControls.js'; let camera; let scene; let renderer; let dirLight; let gridHelper; let axisHelper; init(); animate(); function init() { //シーンの作成 scene = new THREE.Scene(); //カメラの作成 camera = new THREE.PerspectiveCamera(45, window.innerWidth / window.innerHeight, 0.1, 1000); //カメラセット camera.position.set(20, 30, 50); camera.lookAt(new THREE.Vector3(0, 0, 0)); //光源 dirLight = new THREE.SpotLight(0xffffff,1.5);//color,強度 dirLight.position.set(-30, 40, 30); scene.add(dirLight); //レンダラー renderer = new THREE.WebGLRenderer({ alpha: true, antialias: true }); renderer.setClearColor(new THREE.Color(0x000000)); renderer.setSize(window.innerWidth, window.innerHeight); // 滑らかにカメラコントローラーを制御する const controls = new OrbitControls(camera, document.body); controls.enableDamping = true; controls.dampingFactor = 0.2; // gridHelper gridHelper = new THREE.GridHelper(80, 50,0xffff00) //大きさ・分割数・センタラインcolor・マスカラ― scene.add(gridHelper); // axisHelper axisHelper = new THREE.AxisHelper(50); // 軸のサイズ scene.add(axisHelper); //頂点座標の配列(line) const points = []; points.push(new THREE.Vector3(-10,3,0)); points.push(new THREE.Vector3(10,10,0)); //頂点座標の配列からBufferGeometryを生成 const geometry = new THREE.BufferGeometry().setFromPoints(points); const material = new THREE.LineBasicMaterial(); const line = new THREE.Line(geometry,material); scene.add(line); document.getElementById("WebGL-output").appendChild(renderer.domElement); } function animate() { requestAnimationFrame(animate); renderer.render(scene, camera); } </script> </body> |
このコードの、48行~54行が今回記載したヘルパーの内容です。
その他の基本的な部分については、以下に記載していますので是非。
広告
<threeJS学習本>


