Three.jsの使い方を勉強してみた 導入から表示まで
- 2021.05.12
- 01_技術ブログ Three.js
- #Javascript

こんにちは!
この記事は、 「初めてのThree.js」を使い、学習した記録です!
初めの成果物はこちら↓
See the Pen 初めてのThree.js学習① by dyna (@sakudyna) on CodePen.
初めてのThree.js 書籍はこちら↓
 | 初めてのThree.js 第2版 WebGLのためのJavaScript 3Dライブラリ [ Jos Dirksen ] 価格:4,400円 |
では、一番初めの入門のところから!!
広告
Three.jsのDL
まずはThree.jsのライブラリをDLします。(※three.jsはJavaScript製のライブラリです)
まずは公式サイトへ。
左側のdownloadをクリックします。
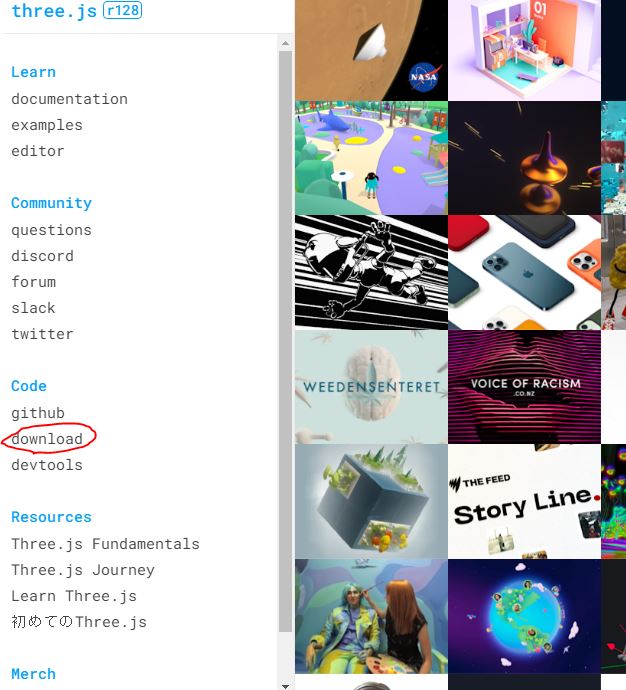
ダウンロードできたら、zipを開いて、buildの中の「three.js」または「three.min.js」を自分のHTMLを作成しているフォルダに配置します。
あとは通常のように読み込みます。
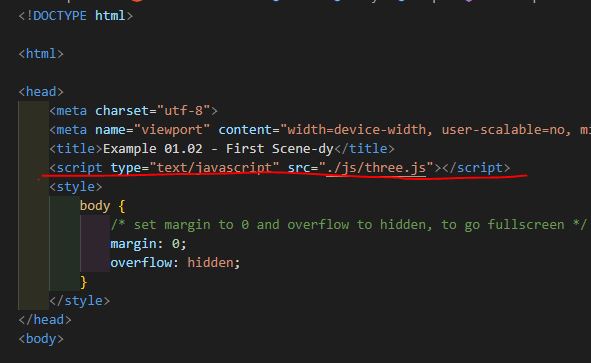
学習なので、ソースが分かりやすいthree.jsを使用します。
three.min.jsはミニファイルバージョンで、4分の1の大きさらしい・・・!
サンプルコードをもとに作ってみる
この記事ではcodepenのコードをもとに書いているので、JSの読み込みを
1 2 3 | <script src="https://cdnjs.cloudflare.com/ajax/libs/three.js/r120/three.min.js"></script> |
として使っています。
2.three.jsを読み込み、描画する
3.描画の仕方は、
シーン(空間)に、メッシュ(表示物)(ジオメトリ(形)とマテリアル(素材)で作る)を置き、カメラを通して、レンダラーを使ってHTMLのcanvasに表示する
聞いたことない単語がいっぱい( ^ω^)・・・
この後の項目で確認していきます。
まずは、全体のコードでどう作るか見ていきます。
1 2 3 4 5 6 7 8 9 10 11 12 13 14 15 16 17 18 19 20 21 22 23 24 25 26 27 28 29 30 31 32 33 34 35 36 37 38 39 40 41 42 43 44 45 46 47 48 49 50 51 52 53 54 55 56 57 58 59 60 61 62 63 | <head> <meta name="viewport" content="width=device-width, initial-scale=1"/> <title>Example dy</title> <script type="text/javascript"src="https://cdnjs.cloudflare.com/ajax/libs/three.js/99/three.min.js"></script> </head> <body> <!-- 描画 --> <div id="output"> </div> <!-- JSの読み込み --> <script> // once everything is loaded, we run our Three.js stuff. function init() { // シーンの作成(物体、光源の表示、保持をするオブジェクト) const scene = new THREE.Scene(); // カメラの作成(何が見えるかの設定) const camera = new THREE.PerspectiveCamera(45, window.innerWidth / window.innerHeight, 0.1, 1000); // レンダラーの作成(cameraオブジェクトの角度に基づき、sceneオブジェクトがどう見えるか計算してくれる) const renderer = new THREE.WebGLRenderer(); //背景色 renderer.setClearColor(new THREE.Color(0xFDFDFD)); //sceneの大きさの通知 renderer.setSize(window.innerWidth, window.innerHeight); //デバイスの表示調整 renderer.setPixelRatio(window.devicePixelRatio); // 平面の定義 幅、高さ const planeGeometry = new THREE.PlaneGeometry(30, 30); // 基本的なマテリアルの作成 const planeMaterial = new THREE.MeshBasicMaterial({color: 0xcccccc}); // 平面の定義と、マテリアルを合わせてmeshオブジェクトにする const plane = new THREE.Mesh(planeGeometry, planeMaterial); // planeの配置 plane.rotation.x = -0.5 * Math.PI; plane.position.x = 0; plane.position.y = 0; plane.position.z = 0; // sceneにplaneを追加して表示する scene.add(plane); // sphere(球)の作成 const sphereGeometry = new THREE.SphereGeometry(10, 20, 20); const sphereMaterial = new THREE.MeshBasicMaterial({color: 0x1597bb, wireframe: true}); const sphere = new THREE.Mesh(sphereGeometry, sphereMaterial); // sphereの配置 sphere.position.x = 0; sphere.position.y = 10; sphere.position.z = 1; // sphereをsceneに追加して表示する scene.add(sphere); // カメラを中心に配置する camera.position.x =-30; camera.position.y = 40; camera.position.z = 30; camera.lookAt(scene.position); // HTMLにレンダラーの出力を追加する document.getElementById("output").appendChild(renderer.domElement); // renderに指示 cameraをsceneに渡して、表示する renderer.render(scene, camera); } window.onload = init; </script> </body> |
描画する場所を作成
まず、HTMLに描画する場所を作成します。
outputに書き出します。
1 2 3 4 5 | <!-- 描画 --> <div id="output"> </div> |
処理を書いていく
function init(){~ この中にthree.jsの処理を書いていきます。
1 2 3 4 5 | function init() { この中に処理(表示)を書いていく } |
用語
結構専門的な用語が出てきて???となったので、簡単に記録しておきます(;’∀’)
| シーン(scene) | 表示したいすべての物体・光源を保持して、変更を監視するコンテナオブジェクト |
| カメラ(camera) | シーンを描画するときに、何が見えるか決定するオブジェクト |
| レンダラー(renderer) | カメラの角度に基づいてシーンがどのように見えるか計算する シーンをcanvasへ描画する |
| メッシュ(Mesh) | ジオメトリ(形)とマテリアル(素材)で作成されるオブジェクト。 オブジェクトの見た目を設定する。 |
シーンを作成する
シーンは上記でいう、表示したいすべての物体・光源を保持して、変更を監視するコンテナオブジェクトでした。
1 2 3 4 | // シーンの作成(物体、光源の表示、保持をするオブジェクト) const scene = new THREE.Scene(); |
カメラを作成する
カメラは上記でいう、シーンを描画するときに、何が見えるか決定するオブジェクトでした。
1 2 3 4 | // カメラの作成(何が見えるかの設定:数値は「視野角度, アスペクト比(縦横の比率), どのくらい近くから開始するか, どのくらい遠くまで見えるか」の順) const camera = new THREE.PerspectiveCamera(45, window.innerWidth / window.innerHeight, 0.1, 1000); |
レンダラーを作成する
レンダラーは、カメラの角度に基づいてシーンがどのように見えるか計算し、シーンをcanvasへ描画します。
ここで、背景色、シーンの大きさ、スマホでもきれいに見えるように設定をしておきます。
1 2 3 4 5 6 7 8 9 10 | //レンダラーの作成(cameraオブジェクトの角度に基づき、sceneオブジェクトがどう見えるか計算してくれる) const renderer = new THREE.WebGLRenderer(); //背景色 renderer.setClearColor(new THREE.Color(0xFDFDFD)); //sceneの大きさの通知 renderer.setSize(window.innerWidth, window.innerHeight); //デバイスの表示調整 renderer.setPixelRatio(window.devicePixelRatio); |
平面を作る
まず、デモの灰色の四角部分、平面を作成してみます。
形を作って表示させるには、ジオメトリ(形)+マテリアル(素材)でメッシュ(見た目)を作って表示します。
ジオメトリ(形)を設定します。
1 2 3 4 | // 平面の定義 幅、高さ const planeGeometry = new THREE.PlaneGeometry(30, 30); |
※ジオメトリの種類は色々ありますが、ここでは平面の THREE.PlaneGeometry を使用します。
種類が気になるので、その辺は調べて詳しく書きたいと思います。
このサイトも参考になりました。
https://ics.media/tutorial-three/geometry_general/
マテリアル(素材)を設定します。
1 2 3 4 | // 基本的なマテリアルの作成 const planeMaterial = new THREE.MeshBasicMaterial({color: 0xcccccc}); |
※マテリアルの種類も同じく色々あります。
メッシュ(見た目)に先ほどのジオメトリとマテリアルを設定します。
1 2 3 4 | // 平面の定義と、マテリアルを合わせてmeshオブジェクトにする const plane = new THREE.Mesh(planeGeometry, planeMaterial); |
平面(メッシュ)を設置します。
1 2 3 4 5 6 7 | // planeの配置 plane.rotation.x = -0.5 * Math.PI; plane.position.x = 0; plane.position.y = 0; plane.position.z = 0; |
シーンに平面(メッシュ)を追加します。
1 2 3 4 | // sceneにplaneを追加して表示する scene.add(plane); |
球を作成する
平面と同じように、球を作成します。
基本的には、先ほど平面の作り方と一緒です。
ここでは、マテリアルをワイヤーフレームにしてあります。
1 2 3 4 5 6 7 8 9 10 11 12 | // sphere(球)の作成 const sphereGeometry = new THREE.SphereGeometry(10, 20, 20); const sphereMaterial = new THREE.MeshBasicMaterial({color: 0x1597bb, wireframe: true}); const sphere = new THREE.Mesh(sphereGeometry, sphereMaterial); // sphereの配置 sphere.position.x = 0; sphere.position.y = 10; sphere.position.z = 1; // sphereをsceneに追加して表示する scene.add(sphere); |
カメラの位置を設定する
カメラの位置を設定します。
1 2 3 4 5 6 7 | // カメラを中心に配置する camera.position.x =-30; camera.position.y = 40; camera.position.z = 30; camera.lookAt(scene.position); |
HTMLにレンダラーを追加して出力する
HTMLの表示したい部分にレンダラーを追加します。
1 2 3 4 | // HTMLにレンダラーの出力を追加する document.getElementById("output").appendChild(renderer.domElement); |
次に、レンダラーを使って表示させます。
レンダラーって、プログラムを使って、整形して表示することらしい( ^ω^)・・・
ここで初めて表示されます。
1 2 3 4 | // renderに指示 cameraをsceneに渡して、表示する renderer.render(scene, camera); |
ここまで来て、初めて表示されるんですね・・・・!!!!
初見は難しく感じましたが、なんとなく感覚が分かったような・・・・??
引き続き学習していきたいと思います!!
学習した本はこちら↓

three.jsって、楽しい!!!!ヽ(*゚∀゚)ノ
<あわせて読みたい>
CSSだけでボックスを書いてみた記事はこちら↓
ここまで読んで下さりありがとうございます。
